 Nikon F2AS w/ DP-12 Finder Nikon F2AS w/ DP-12 Finder Updated Aug. 30, 2021 When Nikon introduced the F2 in the autumn of 1971, its predecessor, the Nikon F, was still in high demand. In fact, 1970 had seen the highest ever level of production for the F, with over 100,000 units made. Nikon had intended to cease F production with the deployment of the F2, but demand for the F proved so great that two years elapsed before they were able to discontinue it for good. That is quite a testament to the popularity of the F and is also indicative of the tendency of professional photographers to stick with what is familiar and trusted. A similar thing had happened with the F itself when Nikon wanted to cease production of its rangefinders in 1959. Demand by photographers doubtful of the newfangled SLR and comfortable with their rangefinder cameras caused Nikon to keep them in limited production until 1965. Now history was repeating itself. So how could the F2 possibly compete with its already legendary forebear? By being a better camera, that's how. How much better? Let's find out... 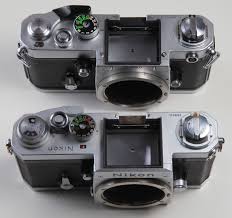 F2 on top; F on bottom F2 on top; F on bottom The Finest Mechanical Nikon...the F2 At first glance, the F2 only looks like a warmed-over F. Which is not a bad thing, considering the esteem the F is held in. But a closer examination shows a much more refined design (1,506 individual parts vs. 918 for the F) with greater capability and better ergonomics. Nikon began work on the prototypes for the F2 in 1965 and kept at it for nearly five years followed by another year of intense testing before the F2 was released for production. Improvements over the F include:
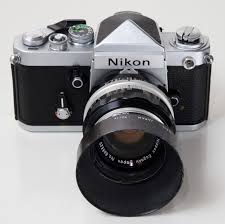 Chrome F2 with DE-1 Plain Finder Chrome F2 with DE-1 Plain Finder Whew! Made it. Now, some may prefer the F's slightly smaller size (not counting Photomic prisms) and weight (about 45 grams less for body only). Some also feel that the F's shutter is quieter than the F2's. That's the beauty of it, there are choices available to suit different preferences. If you are a street shooter, you might prefer the F. Or you might not :-). As with the original F, models are differentiated based on the prism installed. So we start with the basic F2 with the DE-1 non-metered eye-level finder (81,000 produced from 1971-1980). If you want basic and beautiful, this is your pick, no distracting displays, just a 100% viewfinder surrounded by inky blackness, perfect for focusing (no pun intended) on composition. Metering is up to you, whether you choose a handheld meter or go for the original exposure calculator (Sunny 16 and the power of the mind ;-)). The DE-1 has improved build quality over the original F eye-level prism and can even be used on the original F by removing the Nikon nameplate from the front of the F body. The DE-1 does suffer from the same de-silvering problem as the original eye-level F finder due to the deterioration of the foam that seals the prism. Definitely make it a priority to inspect the finder carefully before purchase, and have the foam removed and replaced even if there is no de-silvering at present. As with the F, it is generally cheaper to buy an F2 with the DE-1 finder rather than separately. Black DE-1 finders are usually very pricey on their own. You can find very good user copies of the F2 with DE-1 from $300 - $400 USD in chrome and black. There are also three specialty non-metered finders available for the F2: the DA-1 Action Finder (gives 63 mm or 2.5" of eye relief), the DW-1 Waist Level Finder (image is upright but reversed from left to right), and the DW-2 6x Focusing Finder (also with upright but reversed image but shows at 6x magnification). With any of these finders the camera is called F2. With the metered finders, it's another story. There were five different metered prisms produced for the F2: the DP-1, DP-2, DP-3, DP-11, and DP-12. The corresponding designation of these prisms mated with the camera body are as follows: F2 Photomic, F2S, F2SB, F2A, F2AS. Isn't Nikon alphabet soup great?! So let's try and simplify things a bit. There are two basic ways to categorize the DP finders: by 1) capability and 2) compatibility. 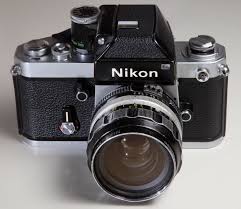 F2 Photomic w/ DP-1 Finder F2 Photomic w/ DP-1 Finder 1) Capability. Logically, as time went by, Nikon continually improved the capabilities of its metered finders. The DP-1 (F2 Photomic), sold from 1971-78, was the most basic and longest-produced model and thus, least expensive and most common (402,000, almost half of F2 production). It is a full information finder, displaying both aperture and shutter speed along with a swinging meter needle to indicate recommended exposure. It uses a CdS (cadmium disulfide) cell for metering with a 6-6400 ISO range and an EV 1 - 17 metering range. From serial number 60xxxx and up, DP-1s came with a much longer-lived wire-cladded resistor versus the original carbon ring resistor. The serial number on all DPs can be found on the underside of the finder.  F2S w/ DP-2 Finder F2S w/ DP-2 Finder The DP-2 (F2S Photomic), debuting in March 1973, was produced until 1976 (73,000 of all F2 production) and introduced LEDs for metering readout. It can be easily differentiated from the DP-1 by the hump on top of the finder. It also uses a CdS cell but the ISO range is 12-6400 and the metering range is EV -2 - 17. This would be the least recommendable finder for an F2 because of reliability problems with the LED circuits. The DP-2 is also the most power-hungry of any F2 finder, consuming anywhere from 2 to 7 times more current than the DP-1/DP-11 and 2 to 3 times more than the DP-3/DP-12. If you are still drawn to the DP-2, definitely pursue later serial-numbered versions as they incorporate all of the improvements Nikon made to address the reliability problems. Look for serial numbers in the 56xxxx to 59xxxx range for the best chance of success. 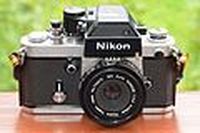 F2SB w/ DP-3 Finder F2SB w/ DP-3 Finder Finally, we have the DP-3 (F2SB Photomic), the rarest and best of the original series DP finders. It was only produced from October 1976 to early-1977 and roughly 21,000 were made. It is an LED (albeit with a different type of display than the DP-2) finder with silicon blue cell (SBC) metering, which is more sensitive and faster-reacting than CdS cell metering. It covers the same film speed and metering ranges as the DP-2. And it has a built-in eyepiece shutter, very handy for long exposure or self-timer work. The DP-3 gives the greatest full-aperture metering compatibility with the range of manual focus Nikkor lenses of any of the F2 finders. We'll get into that a little more later on. So where do the DP-11 & -12 fit in? 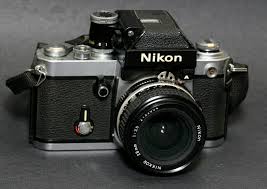 F2A w/ DP-11 Finder F2A w/ DP-11 Finder 2) Compatibility. In 1977, Nikon introduced a new meter coupling system. Meter coupling refers to the capability to relay aperture information from the lens to the metered finder. When Nikon introduced its first Photomic finder for the original F in 1962 it used a coupling pin that engaged a slotted triangular (later, half-moon-shaped) prong mounted on all subsequent manual focus Nikkor lenses. It is popularly referred to as the crab claw or rabbit ears. It had to be manually reset each time the user changed lenses. In 1968, with the introduction of the Photomic FTn finder this process became semi-automatic and stayed the same through the DP-1, -2, and -3. Finally, in 1977, Nikon unveiled its new Automatic Indexing (AI) aperture feature. The DP-11 (March 1977) and DP-12 (July 1977) were updates (with minor internal changes, such as the aperture number display) of the DP-1 and DP-3, respectively, re-engineered to engage with the new AI tab on all new Nikkor lenses instead of the old-style prong. The AI tab remained on all Nikkors up to the introduction of the "G" auto focus lenses that eliminated the aperture ring. So, the DP-11 (F2A Photomic) is the same basic finder as the DP-1, just updated for AI lenses, and the DP-12 (F2AS Photomic) is an AI-updated DP-3. They were both manufactured right to the end of F2 production in 1980. Just as the DP-3 is the most capable of the original finders, the DP-12 (83,000 made) outclasses the DP-11 (154,000 made). That is not to say the DP-1/-11 are bad finders, they just don't have the same level of capability as the DP-3/-12, especially in low light. Some people even prefer needle metering to LED. Again it comes down to personal preference, and cost :-). So, speaking of cost, what are you looking at when it comes to a metered prism equipped F2? Well, an F2 Photomic or an F2A (DP-1/DP-11) will be the least expensive, starting at $175 USD for well-used but working examples, and $250 USD can get you a very nice copy. F2S bodies start at $200 USD. An F2SB in good condition will usually start at $300 USD and $350 - 400 USD will get one in excellent condition. The F2AS starts at about the same level as an F2SB but runs about $400 to $450 USD for bodies in excellent condition. Of course, values rise quickly for mint to unused examples. Let's use the DP-3 and DP-12 to illustrate the compatibility issue more specifically (this will apply equally in principle to the DP-1 vs. the DP-11). Choosing between those two comes down to the metering capabilities of each with non-AI lenses. First off, let's be clear, you can use both non-AI (pre-1977) and AI/AI-s (post-1977) type lenses with both types of finders. The differences lie in the metering procedures you need to use. Because AI/AI-s Nikkor lenses came with the old-style non-AI metering prong and the AI tab, they allow full-aperture (the viewfinder stays bright) metering with both the DP-3 and DP-12. The only advantage of the DP-12 here is the ease of mounting the lens. You just insert the lens and twist it until it locks and the aperture coupling is done automatically. With a DP-3 you twist the lens to lock it, and then twist the aperture ring to minimum aperture and back to maximum aperture to index the lens to the meter. This is the proverbial Nikon "click-click" procedure ;-). You mount a non-AI lens in exactly the same way. With the DP-12 and a non-AI lens, however, you must lock the AI lever on the finder all the way to the right with the front of the camera facing you BEFORE mounting the lens to prevent damage. What this means is that there is no mechanical connection to couple the aperture ring to the finder and thus, no way for the camera to know the aperture setting for metering purposes. This requires Stop-down (manually closing the aperture down, which darkens the viewfinder) metering. The DOF (depth-of-field) preview button is used to do this. When the aperture is stopped-down at your preferred setting, note the reading that the meter gives for shutter speed. Release the DOF preview button, set the the shutter speed dial to the appropriate speed, focus, and fire. Or you can set the shutter speed first, and turn the aperture ring with the DOF preview pressed until the meter indicates proper exposure. Then release the DOF preview, focus, and fire. Don't worry, this all sounds much more complicated than it is in practice :-). To summarize, a DP-3 (F2SB) is slightly more complicated to mount lenses to, but will automatically meter with all of them, whether made in 1959 or 1999, as long as they have the metering prong. The DP-12 (F2AS) will mount any lens from 1959 and up, but will only automatically meter with AI/AI-s lenses made after 1977. If you already have a stock of older non-AI lenses or want to take advantage of their lower prices compared to AI/AI-s Nikkors, the F2SB would be more suitable, but you really can't go wrong one way or the other. . Rare Variants of the F2 As befits a camera designed with the professional in mind, and there are some professionals with very specific needs, Nikon saw fit to provide some special F2 models to address those needs between 1977 and 1984. The story begins in June 1977 with Japanese explorer Naomi Uemura approaching Nikon prior to his solo 1978 North Pole expedition to provide him with F2 bodies especially-prepared for Arctic conditions. By December 1977, Nikon had readied three modified F2 bodies (all had DE-1 Eye-Level finders), two of which were used by Uemura-san on his expedition. These became the first SLRs to sport titanium exterior top, bottom, pentaprism, and front plates (development of which was derived from techniques established for the reflex mirror frame). The Uemura F2s also had improved weather-sealing, film-handling modifications to cope with Arctic temperatures, and anti-static measures, among other minor changes. One of the models used by Uemura was displayed during Nikon's 100th anniversary exhibition in 2017. It has a standard F2 serial number "F2 7733380" and the pebbled-black finish unique to all black titanium F2 examples.The Uemura Specials served as the prototypes (without the weathersealing and film-handling modifications) for all succeeding titanium F2 models. In early-1978, Nikon tried out a few natural-finish titanium F2s, but due to complaints of the bodies being too noticeable and/or reflective, reverted to the semi-matte pebbled black finish for all subsequent versions:
Reliability and Servicing Durability is one of the hallmarks of the F series of cameras, and the F2 did not fail to meet the standard set by the F. In fact, it raised it even further. One of the most important areas to inspect before purchasing is the condition of the shutter curtains. Like the F they are made of titanium foil, and are very durable, but they do not last forever. As they reach the end of their life they begin to develop vertical fatigue cracks, particularly at the ends of the curtains. The only option for replacement is to procure another body with curtains in good condition, so it would be advisable to get a good one in the first place. Also because many F2's were used by pros or serious amateurs be aware of high levels of wear or corrosion on the film guide rails and pressure plate. Next, test out all shutter speeds, paying close attention to the speeds below 1/8 sec.and above 1/500 sec. The highest and lowest shutter speeds are often the first to lose accuracy in a mechanically-controlled shutter, and would indicate the need for a CLA (Clean, Lube, Adjust) for the camera. Proper CLAs for F2's generally start around $125 USD and go up from there. It would be wise to budget for a CLA when considering the purchase of any F2, unless it has had a recent one. If it turns out that it doesn't need one yet, bonus :-). The biggest reliability issues nowadays are found with the various Photomic finders, all of which used a resistor/brush combination of one design or another to make exposure calculations. Rotation of gold-plated brushes against a carbon or other metallic surface inevitably leads to contamination/wear, which eventually leads to erratic or non-existent meter readings. Here is a brief summary by finder designation of such issues and how you can avoid or minimize them:
Wrap-Up The appeal of the F2 is undeniable for those people looking for the ultimate experience in a fully mechanical Nikon. It served as the high watermark for professional mechanical Nikon bodies. By 1980, when production came to a close, 816,000 had been built. As happened when Nikon transitioned from the F to the F2, many photographers were reluctant to move to the new F3 in 1980. So much so that the remaining F2 bodies were priced higher than the brand-new F3s as Nikon tried to induce people to move to the new camera on the basis of lower cost (the completely hand-assembled F2 certainly cost more to produce than the F3). This reaction was more pronounced because, for the first time, electronic control of a pro-level Nikon was ushered in with the F3. But we'll save that story for next time ;-). Next time...Nikon's Electronic Apostasy (aka the F3) References: "Debut of the F2" @ Nikon Camera Chronicle Nikon F2SB User Manual pdf Nikon F2 @ mir.com.my Sover Wong's F2 Repair & Restore Services @ https://soverf2repair.webs.com/ Picture credits: www.wikipedia.org & Wikimedia Commons Vol.12. Special titanium Nikon cameras and NASA cameras @ www.nikon.com 1977 - Development of the Nikon F2 Titanium Uemura Special @ www.nikon.com The Nikon F2H @ http://lightandsea.blogspot.com/2015/03/the-nikon-f2h.html Nikon F Sales Manual - Sept. 1965 @ www.pacificrimcamera.com Nikon F2 Sales Manual - Mar. 1972 www.pacificrimcamera.com Nikon: A Celebration - Third Edition by Brian Long
15 Comments
John Cairns
8/6/2017 07:14:57 am
I enjoyed your discussion of the attributes of the various Nikon F series.
C.J. Odenbach
8/6/2017 08:04:03 am
Glad to hear you enjoyed the articles, John. Let's tackle your second question first.
Des
3/22/2018 01:04:40 pm
I don’t understand the often repeated references to Sover Wong as some sort of guru. I found Mr.Wong to be circumspect in his reply to my enquiries, not a good start and certainly didn’t do anything for my confidence in him or his services.
Colin Odenbach
3/22/2018 02:53:31 pm
Thank you for taking the time to comment, Des. I am glad to hear that you have found a good repair tech that is looking after your needs, which is not the easiest thing, nowadays. It is not my intention to make anybody a "celebrity" nor to discourage people from shopping around. Mr. Wong does provide levels of service and modifications for the F2 that I have been unable to find elsewhere. That is not to say that they don't exist, it just means that I haven't found them yet. Only you can be the judge of your relationships with others. If you feel uncomfortable with Mr. Wong and choose not to use his services, I have no right nor desire to question that. I am glad that you have found an alternative that has met your needs and will allow you to enjoy your F2 for a long time to come.
Bonin
6/2/2019 02:11:39 am
Excellente synthèse. Merci pour ce travail.
C.J. Odenbach
6/2/2019 07:46:04 am
C’est moi qui vous remercie :-).
C.J. Odenbach
3/12/2022 02:46:49 pm
Enjoy :-)
Tom Bowie
5/15/2022 10:10:14 am
Mr. Wong sent me a light seal kit, but I found the density of the door seals to be too light; it was impossible to correctly install.
C.J. Odenbach
5/16/2022 12:07:38 pm
Hello Tom,
Tom Bowie
5/16/2022 05:30:23 pm
Hey thanks CJ. I’m so glad they’re back. I opened up a couple of Nikomats to clean out the prism and focus screen trays, and need to finish with the door seals. I find it much easier to line the cleaned seal channel with perel using a soft baby’s toothbrush. Then I push the seal straight in using a 1mm thick plastic ruler. The little bugger can’t twist on me then.
Jonathan Pearson
11/11/2023 03:51:10 pm
Hi,
C.J. Odenbach
11/12/2023 08:43:38 pm
Glad to hear you enjoyed the article, Jonathan. If you are referring to foam that contacts the pentaprism itself, I believe the DE-1 Eye-level and the DP-3 and DP-12 finders did so, if memory serves me correctly. Sover would definitely know for sure. Best regards.
Art
12/31/2023 09:16:17 pm
Thank you for a wonderful article about the F2. I particularly enjoyed learning the production numbers for various models. Your recommendation of Sover Wong is something I fully support. He has brought back to specs my F2sb, F2as and a DP-11 finder. Yes, there was a considerable wait, but I have not found anyone else who has new photo cells for the DP-11 or the ring resistor for the DP-3 and DP-12. For those who don’t want to wait, I believe he sells cameras that he has repaired and brought back to original specs. Anyone who researches Sover’s work will be impressed.
C.J. Odenbach
1/1/2024 11:33:25 am
Glad to hear that you enjoyed the article, Art. Best regards. Your comment will be posted after it is approved.
Leave a Reply. |
C.J. OdenbachSuffers from a quarter-century and counting film and manual focus SLR addiction. Has recently expanded into 1980's AF point and shoots, and (gack!) '90s SLRs. He even mixes in some digital. Definitely a sick man. Categories
All
Archives
June 2024
|
 RSS Feed